.png)
Volinga Suite - User Manual
What’s new?
The new version 0.4.1 of our UE plugin implements the following improvements:
- Fixed GS freeze when there isn't any gaussian to render
- Fixed far clipping
- Fixed aspect ratio
- Fixed visibility checkbox in Volinga Actor
- Changed alpha blending formula to work properly in AR projects
Furthermore, all the features included in version 0.4.0 are still available:
- 💡Let there be light! Volinga compatibility with direct lighting
- ✨ CineCameraActor advanced support. Achieve professional shots with depth of field compatibility
- 🎮 Unreal 5.4 support
- 🖼 Independent aspect ratio, resolution and screen percentage per viewport
- 📷 nDisplay performance improvements
- ✀ Redesigned crop volume
- 📹 Movie render Queue compatibility
And more quality of life features:
- ↺ Orbit camera support holding Alt key
- 🐛 Compatibility with some debug views, like Unlit or Buffer Visualization subset
- 👁 Use the hidden-eye icon in the Outliner to hide the Gaussians in Editor
- 🕶 Actor Hidden In-game support
1. What is Volinga Suite
Volinga Suite is an advanced tool that empowers creators to effortlessly create and render Radiance Fields in real-time using Unreal Engine. The suite is comprised of three key components: Volinga Renderer, Volinga Exporter, and Volinga Creator. Volinga Renderer is a powerful tool that allows for the rendering of Radiance Field models in real-time, providing a seamless experience for users. The Volinga Exporter enables creators to easily export their Radiance Fields models to an NVOL file format, making it easy to share and collaborate with others. Finally, the Volinga Creator is a user-friendly interface that streamlines the process of creating NeRF models.
2. Volinga Renderer
2.1 What is Volinga Renderer
Volinga Renderer is a software that enables real-time rendering of Volumetric Radiance Field data. This software is powered by the NVOL file format. Volinga Renderer is part of the Volinga Suite, which includes Volinga Creator and Volinga Exporter.
2.2 Plugin for Unreal Engine
Volinga Renderer can be integrated into Unreal Engine using the Connector Plugin provided on the website and within the desktop application. We will go through the process of installation and use of this plugin.
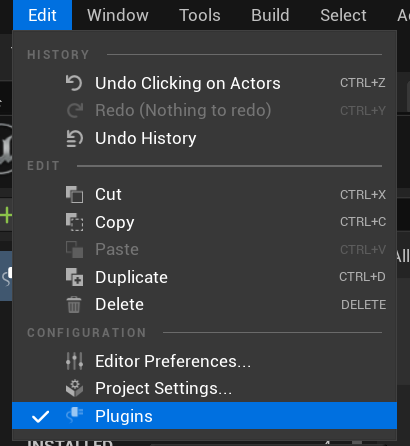
2.3 Installation of the Plugin
To install the Volinga plugin for Unreal Engine, go to the installation path for Unreal Engine within our system. The default path is: “C:\Program Files\Epic Games\UE_5.X\Engine” (but this may be different if you have chosen a custom install location) and copy the folder “VolingaRenderer” into the “Plugins” folder of the engine. It can also be installed in the Plugins folder of a project folder to be enabled on a per-project basis.
Once the plugin is correctly installed, it will appear in the “Plugins” window of Unreal Engine:

The plugin can be enabled by clicking on the checkbox. A message will appear to inform us this is a plugin in beta version:
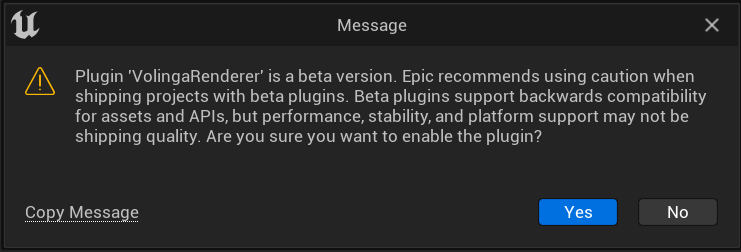
Now, Volinga Renderer plugin for Unreal Engine is ready to be used.
2.4 Volinga Radiance Fields Actor
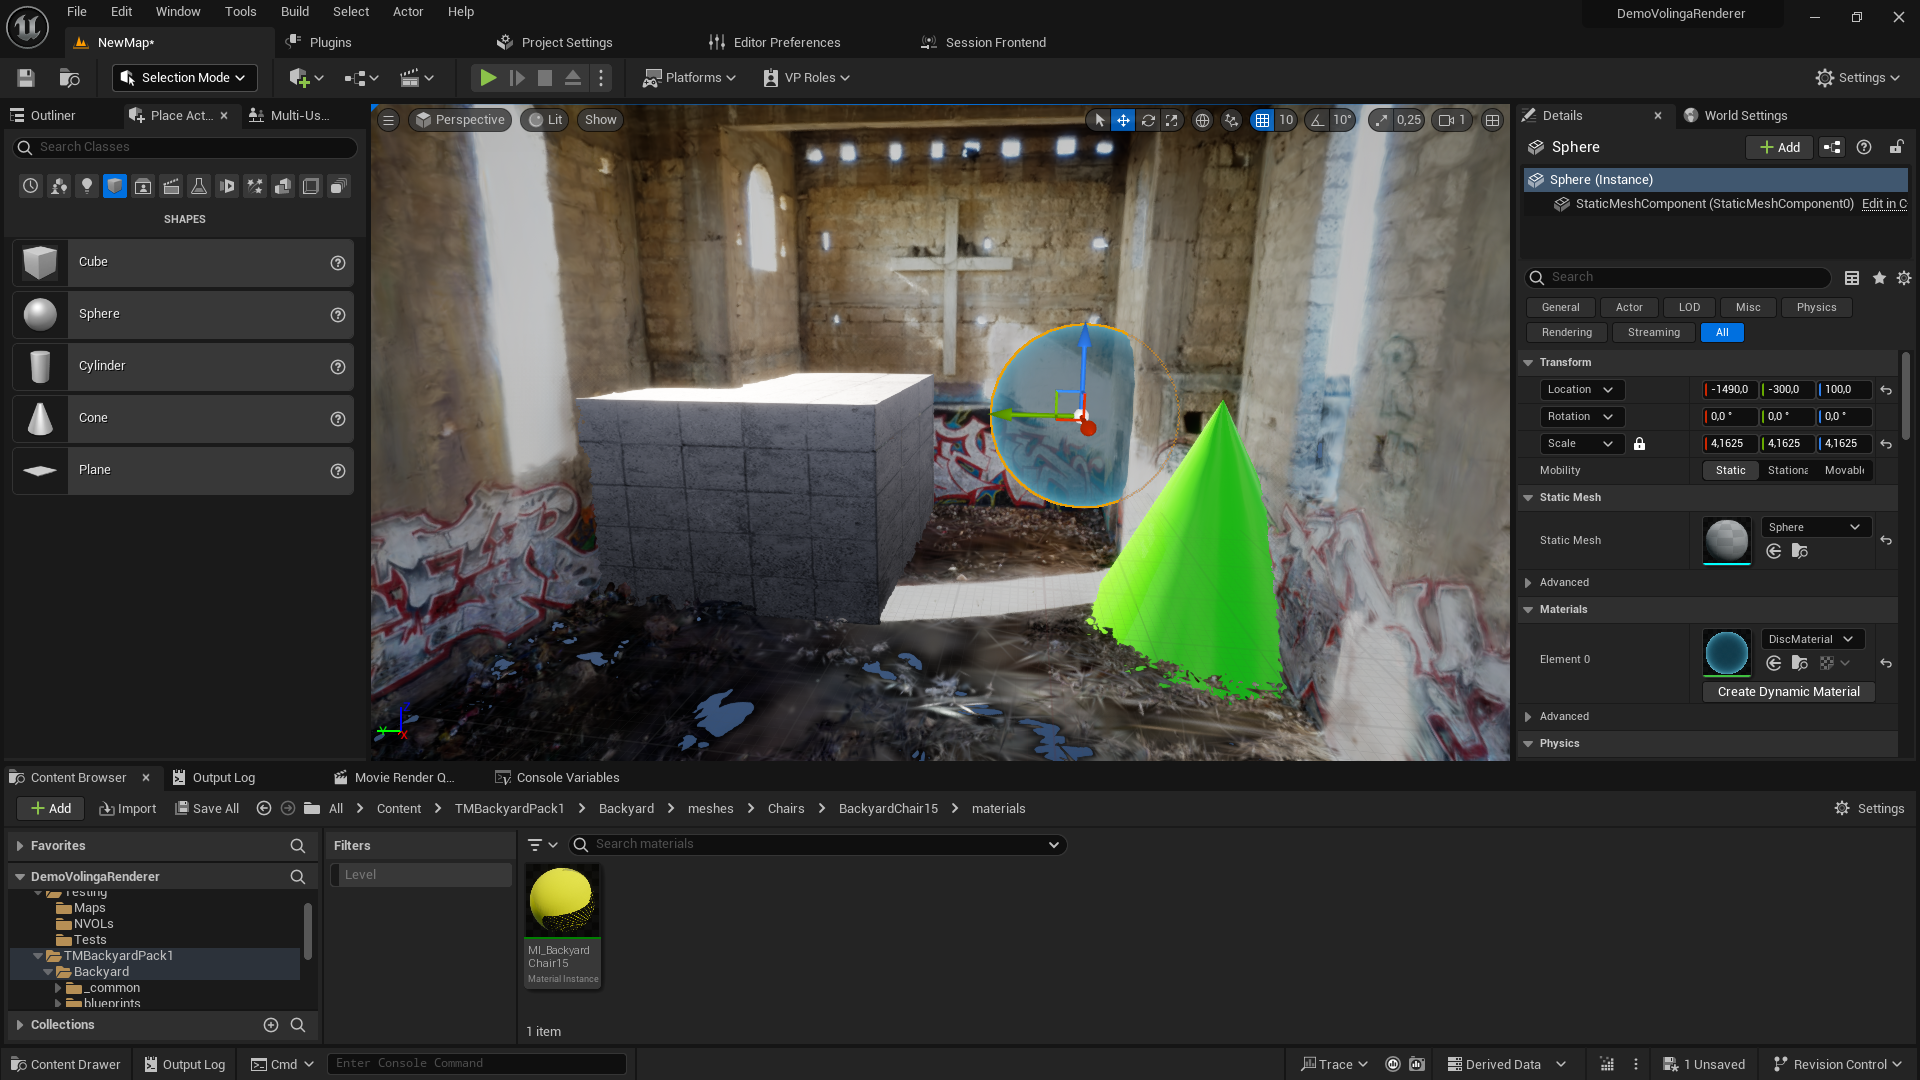
Volinga Radiance Fields Actor is the core actor of the plugin. It acts as a placeholder for Radiance Fields. Volinga Radiance Fields Actor is composed of the Root Actor that represents the Radiance Fields model, the Scene Component that gives the actor a position, rotation and scale and the Crop Volume Component, which represents a cube mesh and is capable of cropping the actor to limit the area of rendering.
Adding an NVOL to your Scene
Using Volinga Radiance Fields Actor is as easy as dragging an NVOL asset to the viewport:
If several Volinga Radiance Fields Actors are present in the same level, only the one that was added in the first place will be rendered. We are working on adding support for multiple NVOL actors.
Radiance Fields Actor Translation
Volinga Radiance Fields Actor also allows the use of Unreal’s gizmos for translation, rotation and scale:
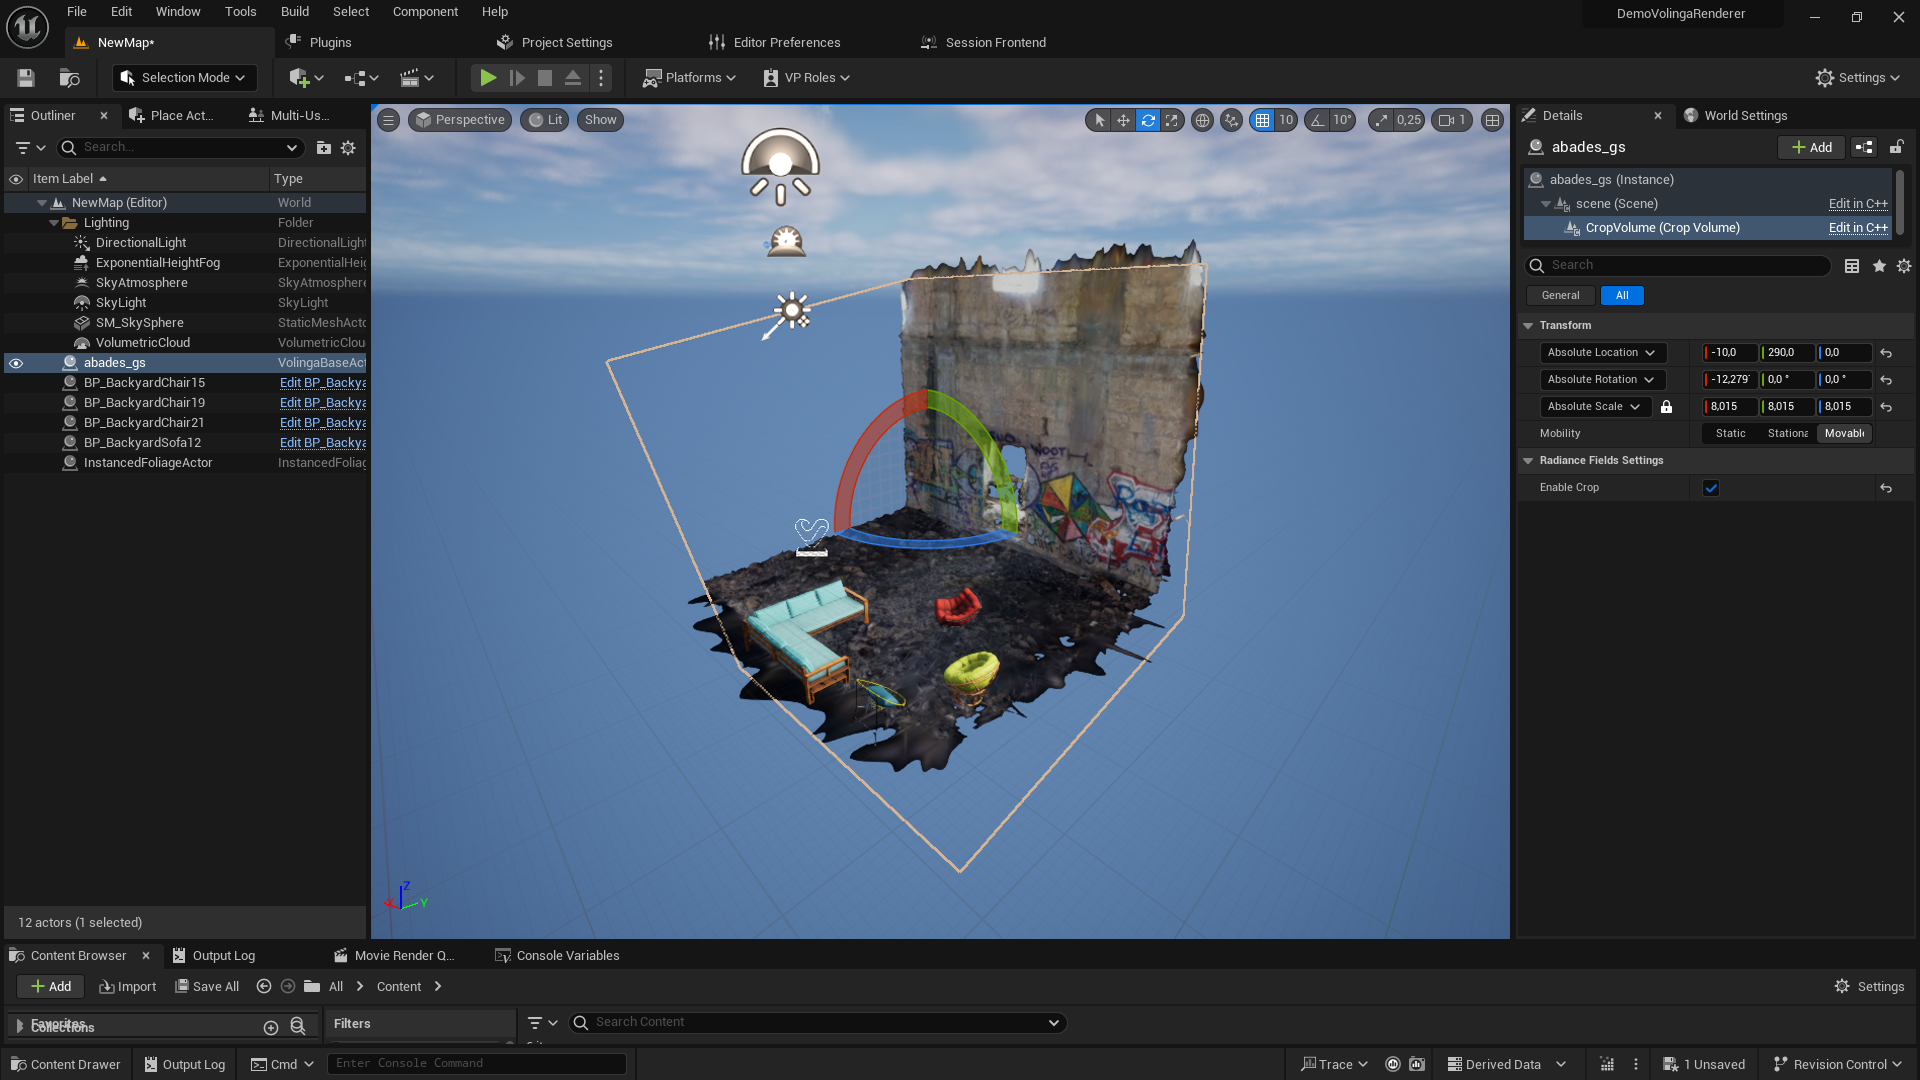
Crop Volume Component
Additionally, you can enable the new Crop Volume Component to limit the area of rendering of the Radiance Field:
Radiance Fields Actor Visibility
You can set the scene visibility of the Radiance Fields Actor by using the hidden-eye icon in the Outliner, this won’t affect it’s visibility in-game or through multi-user when nDisplay is in operation with multiple nodes.
You can disable visibility of Radiance Fields Actor rendering in Play In Editor, Standalone Game and nDisplay by enabling the Actor Hidden In Game property in the details panel.
Using Unreal Actors and NVOLs Together
The Volinga Radiance Fields Actor allows for compositing NVOLs and 3D objects seamlessly, simply compose your scene as you normally would in Unreal.
2.4.1 Actor Properties
In the Details panel of the Volinga Radiance Fields Actor, there are some properties to modify how this Actor is rendered:
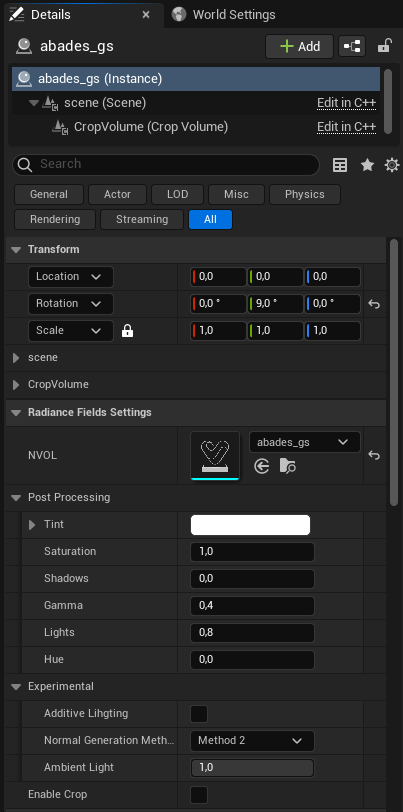
- NVOL: This property allows us to select the NVOL (i.e. Radiance Fields Scene) you want to be rendered. You can select any of the NVOL assets existing in your project.
- Post processing settings
- Tint: Allows the Radiance Fields to be tinted with a solid colour
- Saturation: Set colour saturation
- Shadows: Set the dark tones of the Radiance Fields
- Gamma: Set the middle tones of the Radiance Fields
- Lights: Set the light tones of the Radiance Fields
- Hue: Set the hue tint
- Experimental settings
- Additive lighting: Allows the Radiance Fields to interact with direct lights
- Normal Generation Method: Select one of the three possible normal map generation algorithms
- Ambient Light: Soften the hard shadows that direct lighting can generate
- Enable crop: Enables or disables the Crop Volume
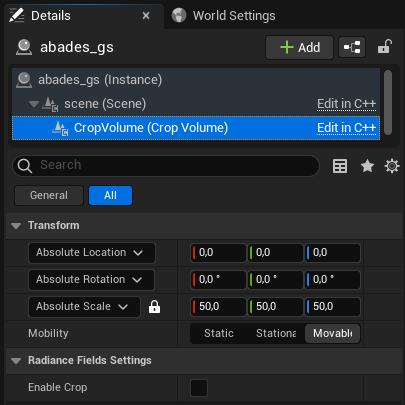
2.4.2 Crop Volume Component
Volinga Radiance Fields Actor comes with a component used to establish bounds of the Radiance Field asset. It has it own transforms (position, rotation and scale) and they are independent of the Volinga Radiance Fields Actor, so you can move the Actor and the Component independently. You can enable and disable the Crop Volume from here too.
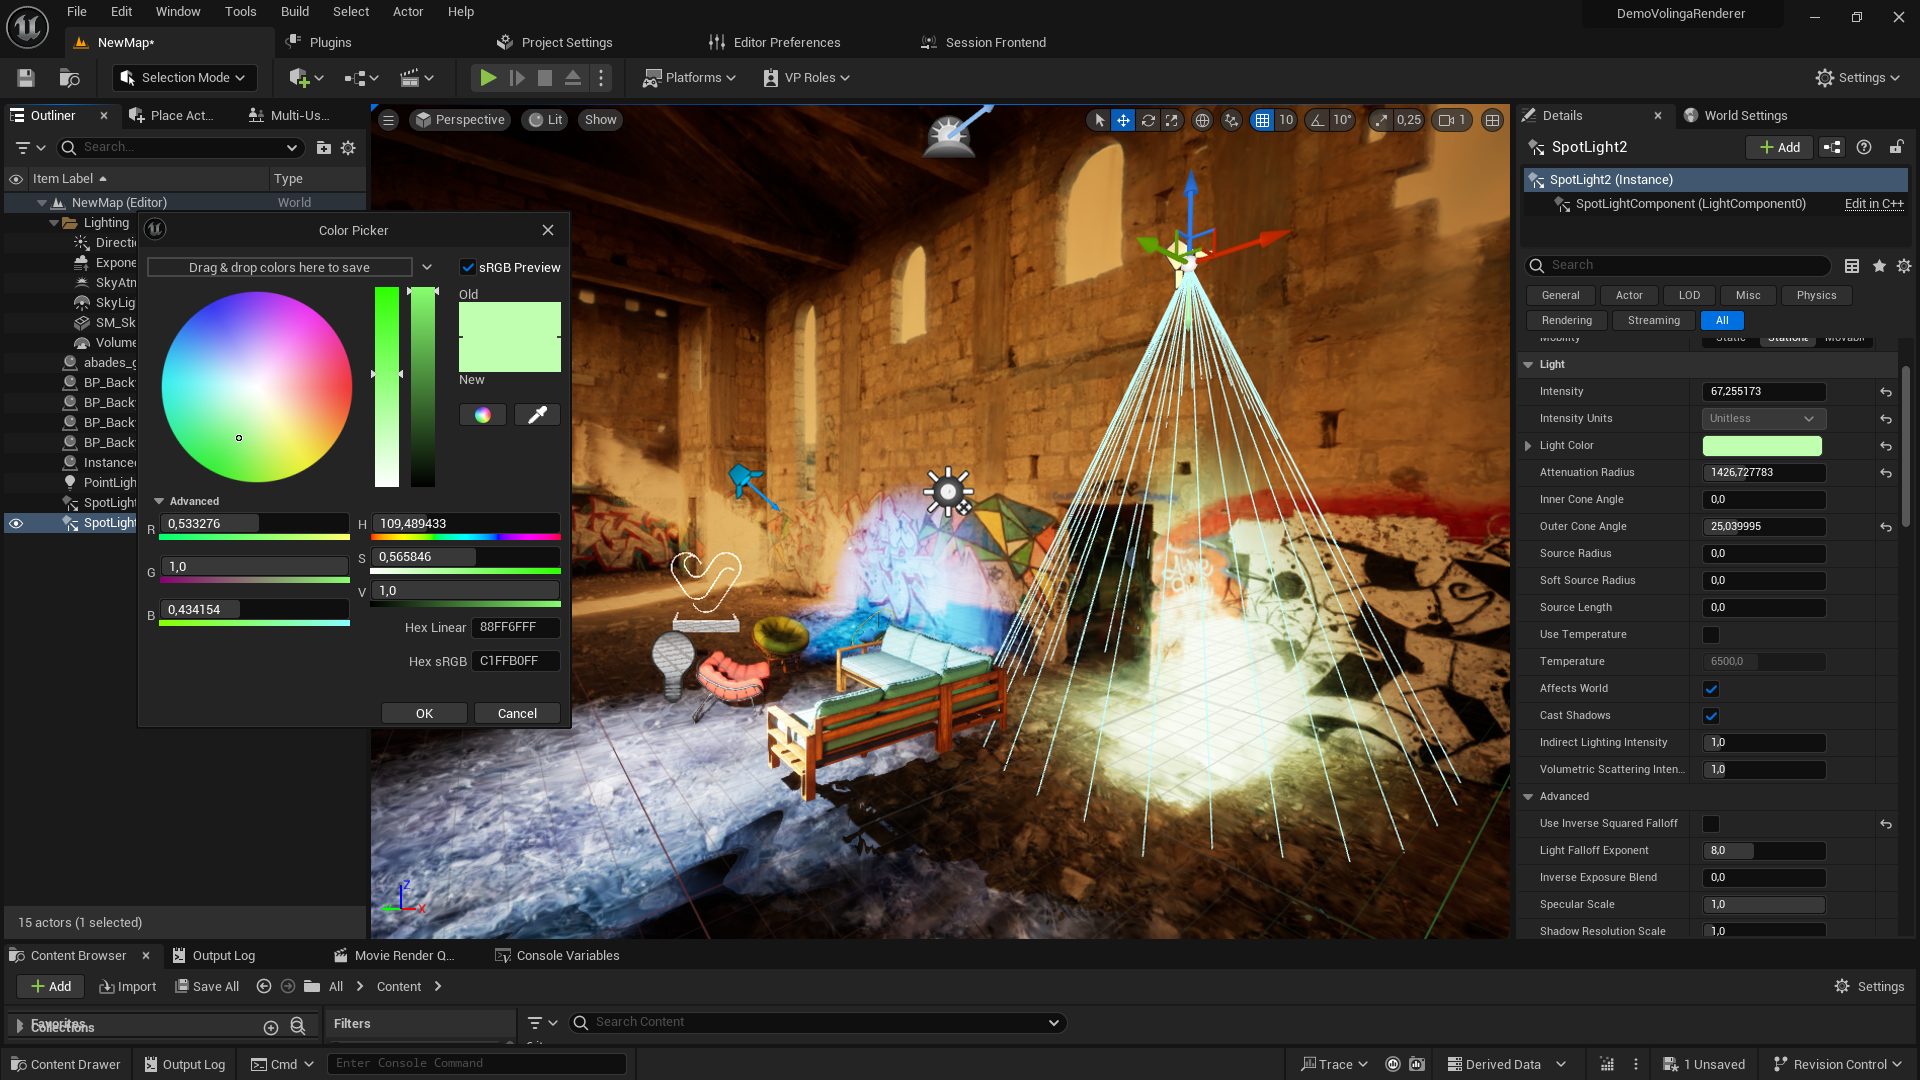
2.5 Volinga and Disguise RenderStream
To use Volinga Renderer together with Disguise RenderStream, we recommend using the native integration which directly connects the Disguise system to the Volinga Renderer. You can learn more about it here.
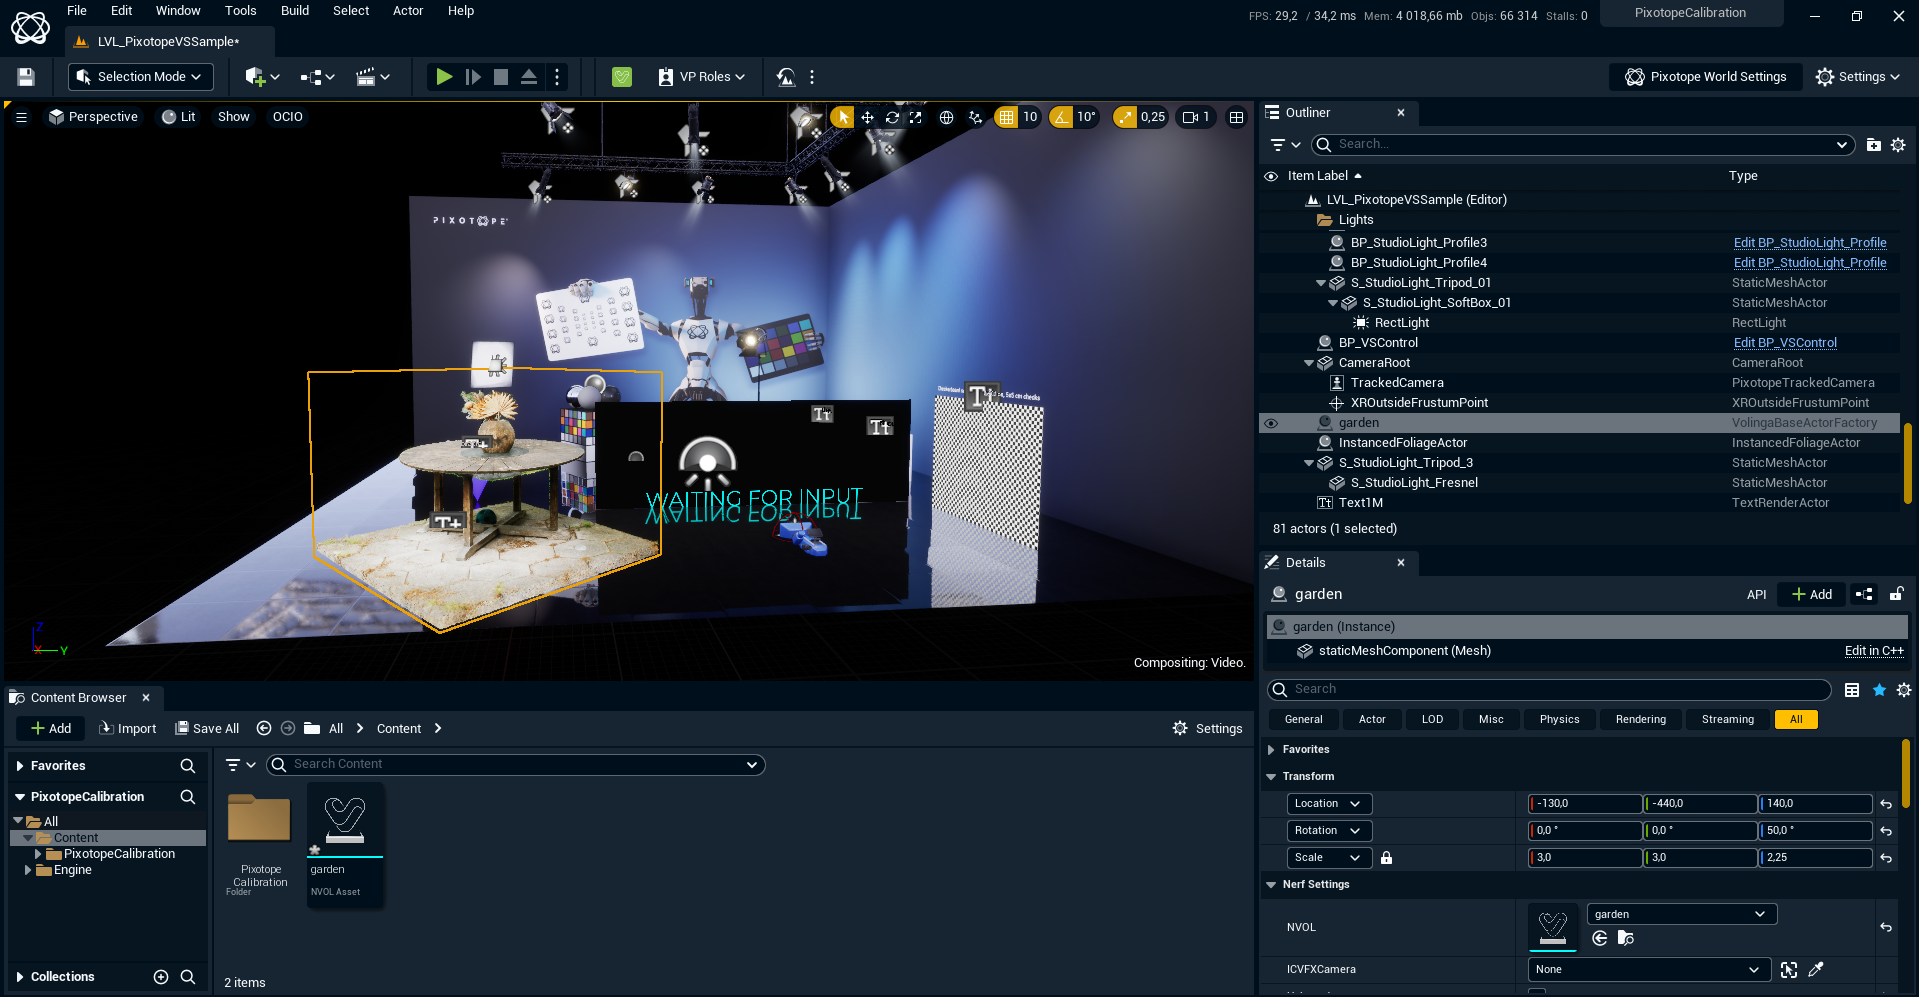
2.6 Volinga and Pixotope
Volinga can be used in conjunction with Pixotope using our custom plugin.
2.7 Volinga and Nuke Server
Volinga can be used in NukeX using the Nuke Server plugin. Using a Level Sequencer and the Unreal Reader Node in Unreal, sequences can be rendered directly into Nuke.
3. Volinga Exporter
Volinga Exporter is a tool to convert .ckpt files trained using NeRFStudio and .ply files created using 3D Gaussian Splatting into NVOL files. In the case of NeRFStudio, Volinga Exporter only supports Volinga model, which is an external method. You can add Volinga to your existing NeRFStudio installation using:
pip install git+https://github.com/Volinga/volinga-modelOr you can follow the instructions at https://github.com/Volinga/volinga-model. When you have added Volinga method, you an now train a new NeRF:
ns-train volinga --data /path/to/your/data --vis viewerOnce the training is done, you can find your checkpoint file in the outputs/path-to-your-data/volingafolder. Then, you can drag it to Volinga Suite to export it to NVOL.
In the case of 3D Gaussian Splatting, you can create .ply files following the instructions provided in https://github.com/graphdeco-inria/gaussian-splatting. You can convert it into an NVOL file following the same process.
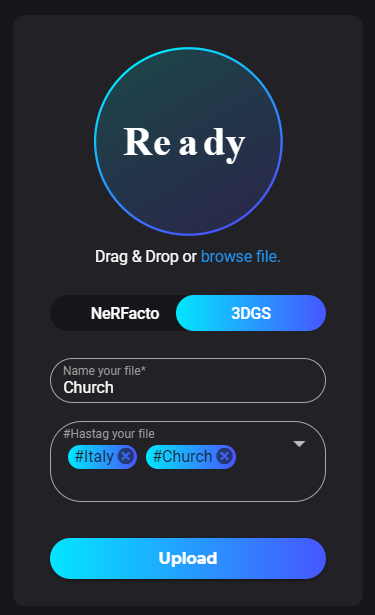
4. Volinga Creator
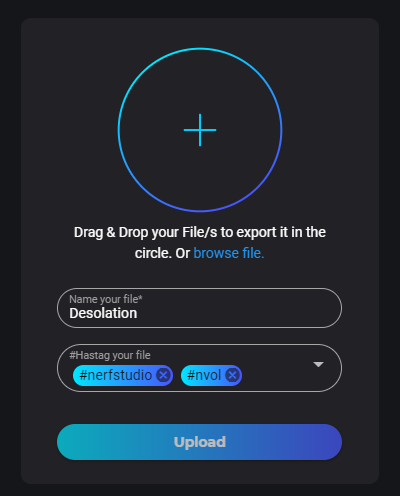
To train NeRFs using Volinga Creator you can drag and drop training images (.jpg, .jpeg, .png, .tif, .tiff) or a training video (.mp4, .mov) onto the + icon.

After giving your new asset a name and any tags you’d like to assign to it, click upload to begin the process of generating an NVOL asset.
4.1 Best Practices for Capturing Scenes
When capturing videos or images to create radiance fields, the capturing process has a a very high level of influence on the output quality. We strongly recommend to follow this guide developed by Jonathan Stephens and Jared Heinly for good capture practice:
We also recommend to watch the episode of the podcast “Computer Vision Decoded” where they explain this guide in detail: https://www.youtube.com/watch?v=AQfRdr_gZ8g&t=4s
5. Volinga Desktop
Volinga Desktop allows you to have the complete pipeline of Volinga Suite running locally on your computer. Currently, Volinga Desktop provides two different modules: Volinga Installer and Volinga Exporter.
5.1. Volinga Installer
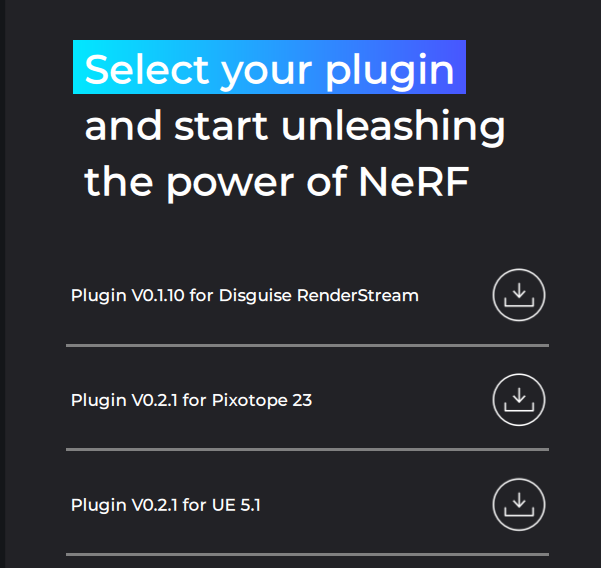
Volinga installer provides a on-click installation for the different plugins of Volinga:
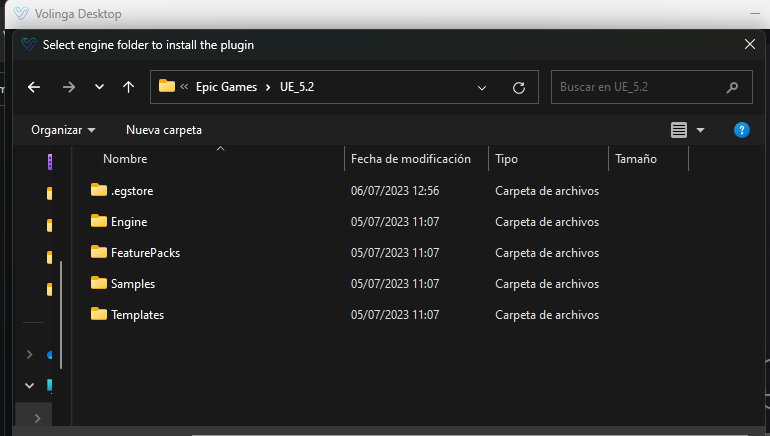
When a plugin is selected to be installed, a dialog window will pop up to select the installation path. For each of the plugins, the installation path will be different:
Unreal Engine: Select the Unreal Engine installation folder, which by default is in: “C:\Program Files\Epic Games\UE_5.X\Engine”:
Pixotope: Select the Pixotope Engine installation folder, which by default is in: “C:\Program Files\Pixotope\{Pixotope Version}\Pixotope Engine”.
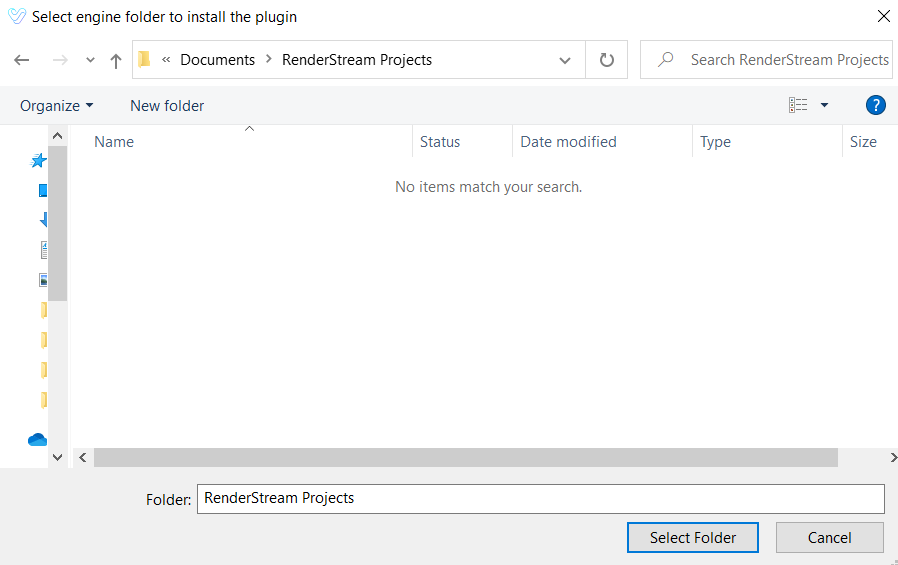
Disguise:
Select the RenderStream projects folder, usually located under:”C:\Users\{current-user}\Documents\RenderStream Projects”
Once the installation is finished, your plugin will be ready to be used!
5.2 Volinga Creator
In the Creator section you can create new NVOLs, either online through our web service or locally if you have a graphics card that meets the minimum specifications.
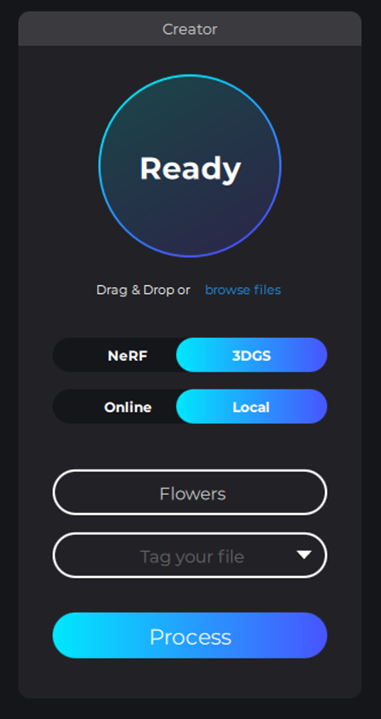
To create a new NVOL, drag and drop a dataset onto the "+" button, or click on this same button to manually select the files. The allowed datasets are the following:
- JPG, PNG or TIFF images. If the training is online, the maximum number of images is 2000. Currently only images with a colour depth of 8 bits are accepted.
- Videos in MP4 or MOV format. The maximum number of videos in online trainings is 1, and their size cannot exceed 5 Gb. In local training you can add as many videos as you want, but they must be recorded with the same camera.
- PLY or CKPT files.
- COLMAP datasets. To add COLMAP datasets you must follow the following file and folder structure:
- colmap
- images
- jpg
- jpg
- …
- sparse
- 0
- bin
- bin
- bin
- 0
- images
- colmap
Once you have done this, you must select the type of training you want to do, NeRF or 3DGS, and whether you want to do it locally or online.
Next, a name for the NVOL must be configured and tags can be added if desired, after which the Process button can be clicked.
Advanced parameters
When performing a local training session, before starting it, a window will be displayed to select the advanced training parameters that can be configured:
Before starting local training, a window will be display that allows you to configure some advanced parameters. The default values have been chosen to give good results across datasets; however they can be tweaked by advanced users wishing to experiment with their results.
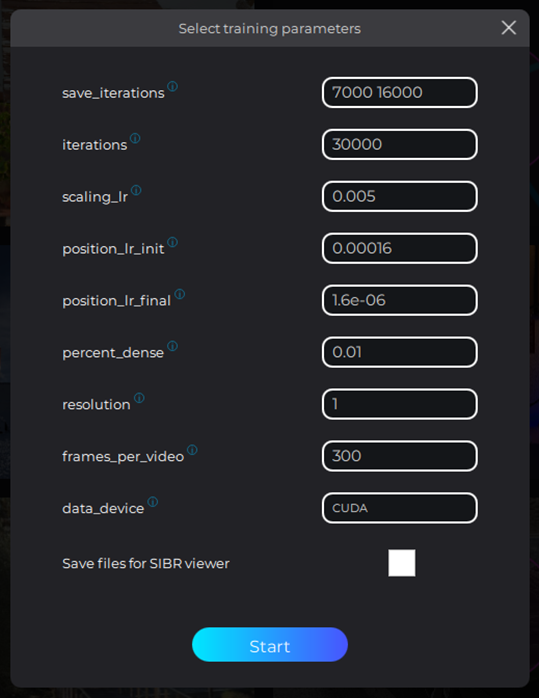
The functionality of each of these parameters is specified below:
- save-iterations: Represents the iterations of the model to save, besides the final output. You must specify it using spaces to delineate each iteration number.
- iterations: it represents the number of iterations you want to try the model. Higher iterations usually achieve higher quality models, but longer training times. Lower iterations will result in lower quality and less defined models, but quicker training times.
- resolution: Represents the factor of which the training images are downscaled. For example, if your training images are 3840x2160 and you set resolution to 2, the images will be downscaled to 1920x1080 during training.
- frames per video (video files only): Represents the number of frames extract from a video.
- data_device: it specifies the device where the images will be stored during training. CUDA will result in a faster training but will require high amounts of GPU memory (8GB+ recommended). CPU will result in a slower memory (since images have to be transfered to GPU on each iteration) but will reduce GPU memory consumption.
- Save files for SIBR: if checked, the file structure for the original SIBR viewer will be generated.
- scaling_lr: learning rate for scale matrix
- position_lr_init: initial learning rate for gaussians positions.
- position_lr_final: final learning rate for gaussians positions.
- percent_dense: the extent of the scene (in percent) that a gaussian must exceed before being split.
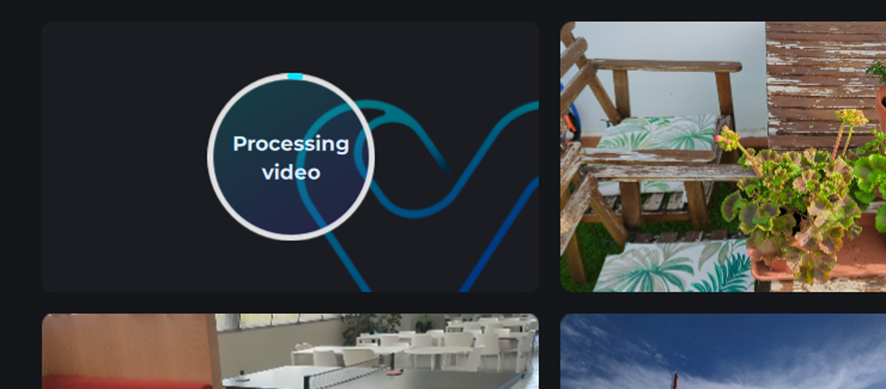
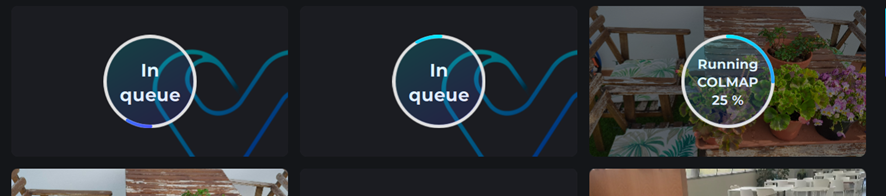
Once the parameters are set, press the Start button and wait for the process to finish. Progress will update during training on the gallery thumbnail:
Continue Training and Retrain
It’s possible to retrain assets that have been completed with modified parameters and to continue previously paused training.
Retrain
To retrain an NVOL, open the context menu and click on the "Retrain" option. This will load the dataset into the Creator and you can then click on Process and Start to begin training with the defined advanced parameters.
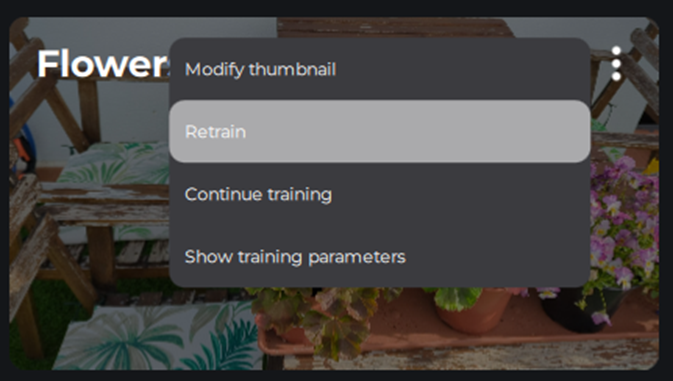
The Retrain process uses the COLMAP data calculated in the original training to save training time.
This is a workflow for testing different advanced parameter settings without needing to wait for the COLMAP step to complete.
Continue training
To continue training from where you left off, simply open the NVOL context menu and click Continue training. This will load the NVOL into the Creator and you can then click Process, select the desired final iterations, and click Start to continue training with the selected advanced parameters.
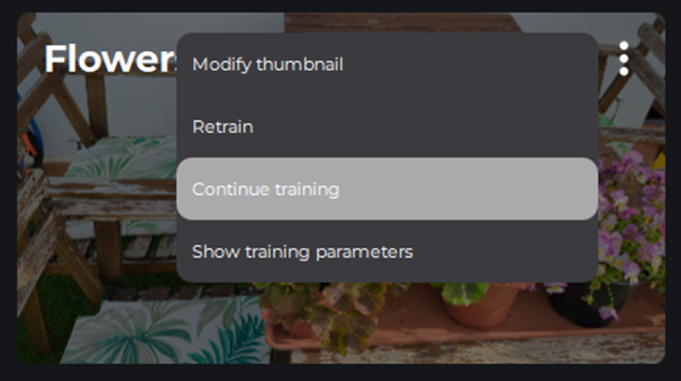
When continuing a training session, the advanced parameters that will be loaded will be the original ones, but they can be modified before continuing the training session.
Queue Trainings
To queue training, simply start a new training with one of the methods mentioned above (Creator, Retrain or Continue training), which will add this new process to the list of pending tasks and will appear in the gallery view.
5.3 Volinga Editor
Volinga Editor provides a way to modify your 3DGS files.
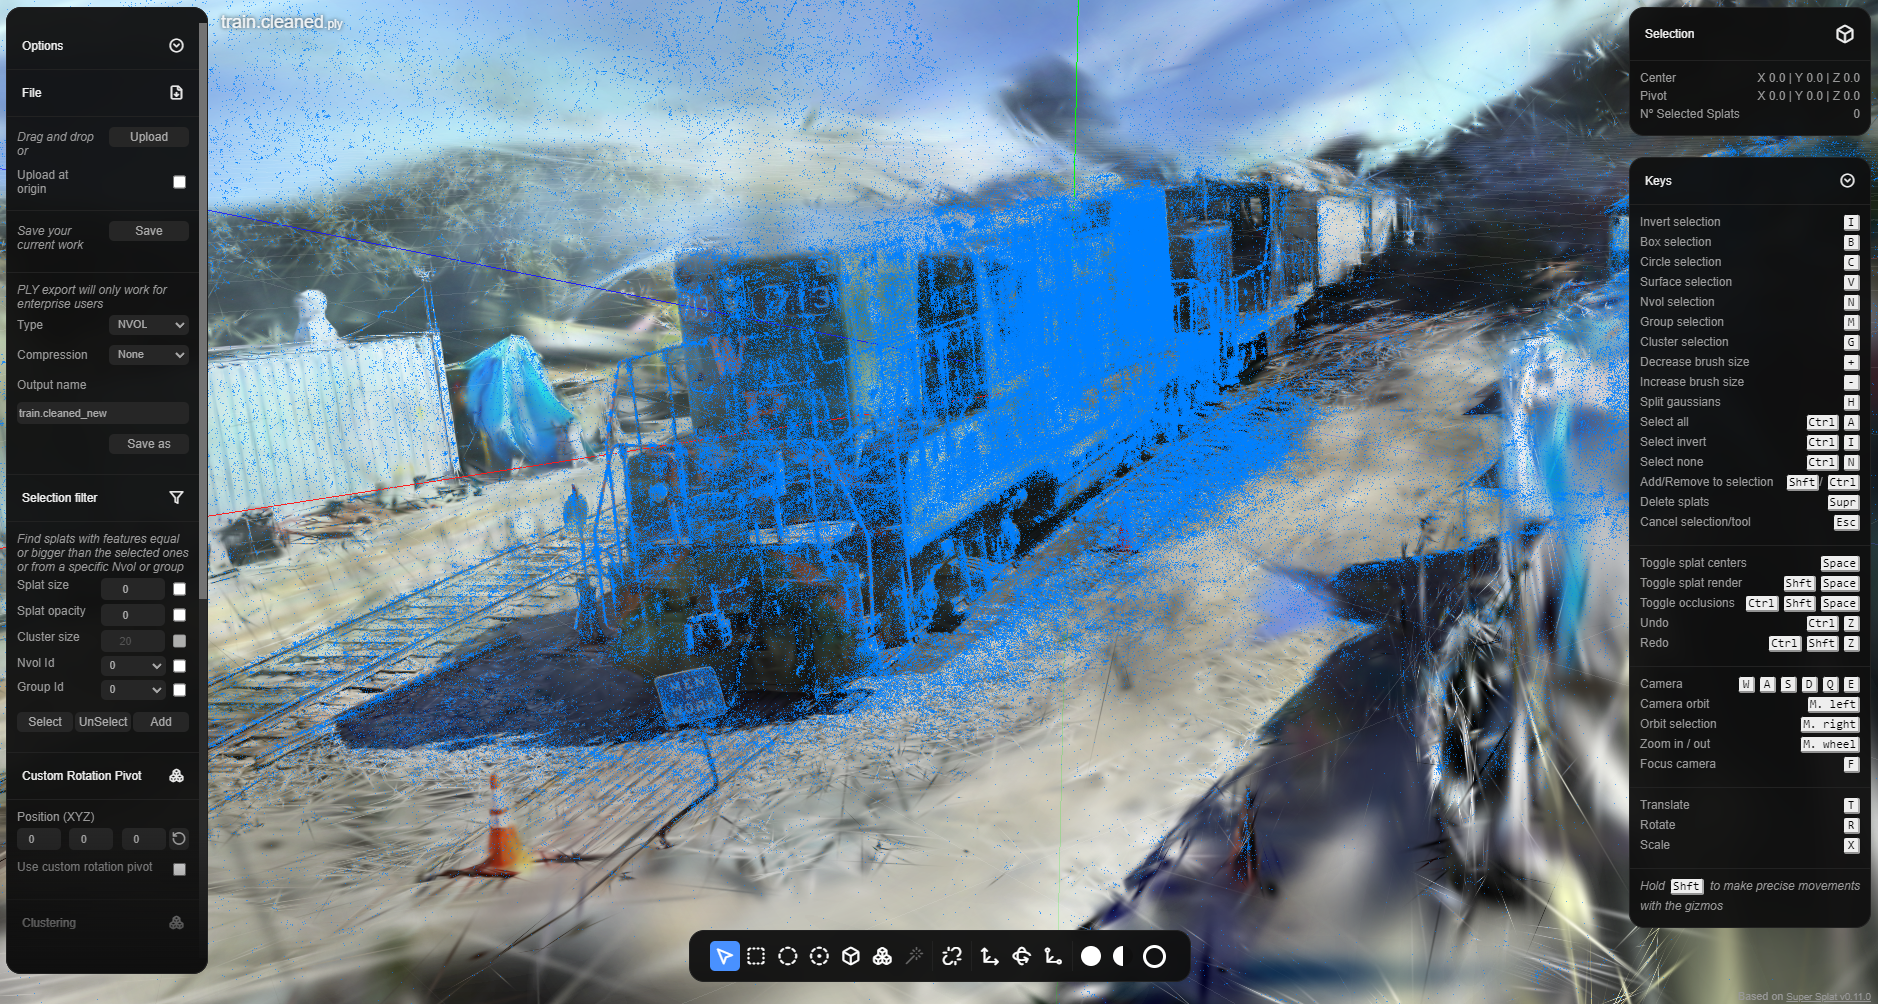
The interface is simple to use; however, it still has its limitations that we are working on improving and adding many more features. There are four visible menus in the UI:
- Bottom right menu: Key shortcuts
- Bottom top menu: Current selection information
- Left menu: Tools
- Bottom menu: Most used tools
In the bottom menu we have the Box (B) and Circle Selector (C) on the left. Use the Shift key to add to selection and the Ctrl key to remove from selection, Esc to deselect the tool.
You may change the size of the tool with keys + and -. And use the keys Space and Shift + Space to toggle the point cloud or splats rendering on and off respectively.
The next tool in the row (experimental) allows for selection of only the immediate surface that’s covering most of the cursor area: Surface Selector (V). The selection is always a circle and it ignores whether the user moves the brush or not.
The NVOL selector (N) selects entire NVOL assets, not single points within an NVOL. And the Group selector (M) allows you to select groups defined by the user- Groups can be defined either with the (H) key or using Split Gaussians button at the center of the toolbar.
The next tool is the cluster Selection Tool (G) which we will skip for now. The next three tools in the bar are the gizmos to translate (T), rotate (R) and scale (X); hold down the Shift key before pressing down a gizmo to have a more accurate and slower movement. Rotation allows you to define a pivot point if selected in the left menu under “Custom rotation pivot”.
The last three tools in the toolbar are Select all (Ctrl + A), Invert selection (Ctrl + I) and Select none (Ctrl + N).
Camera movement
Camera movement works with the common WASD + QE keys and the left mouse button to control the camera rotation. The mouse wheel may also be used to move forward or backwards, however, it will move the camera a greater distance when further away and vice-versa.
While a selection is active, hold the right mouse button to orbit around and the mouse wheel to zoom in and out.
Upload Section
On the left menu, from top to bottom we start with the upload section. The upload section is used to upload NVOLs to the editor, different NVOLs will have different colours and consecutive IDs. You may check the “upload at origin” checkbox, this will make all NVOLS centred at the origin when they load, otherwise they may have a translation offset.
Export Section
Here you can export as either a new NVOL or as a PLY. When using the NVOL format, different compression levels are available.
The save button will overwrite the original asset. The “Save as” button saves with the name provided in the text input below. Be aware that if you use save as with the same name, it might be overwritten.
When saving, all loaded NVOLs with the modifications are saved to a unique NVOL (or ply) file. And all the groups that may have been defined are not stored.
Selection Filter
The selection filter allows you to set some criteria for filtering the points you want. Mark the checkbox of each criteria you want to filter for:
- Splat size (usually in the magnitude of 0.001): Splats with equal or bigger size
- Splat opacity (range 0 to 1): Splats with equal or bigger opacity
- Cluster size (you will usually want to select relatively small clusters). This requires clustering: Whole clusters with a minimum size
- NVOL ID (sequential integer): Splats that belong to a specific NVOL
- Group ID (sequential integer): Splats that belong to a specific group
The selection filter allows to exclusively select, unselect from the current selection or add to the current selection all gaussians that satisfy the criteria.
Clustering section
This is still an experimental feature that allows the user to group the gaussians in the scene. Press the run button to start clustering. There are two parameters:
- Cluster distance: how likely one gaussian is to be in the same group of neighbour based on distance
- Dynamic distance: increase cluster distance when far away from the origin
After the clustering have been completed. We may use the cluster size as a Selection Filter or directly use the Cluster Selection (G) tool from the bottom tool bar. This tool will select all clusters under the cursor.
We may also transform the clustering result to groups.
Settings
Lastly, the settings section:
- Point cloud size: size of the point cloud squares representing each splat’s origin
- Point cloud visibility: toggle point cloud render
- Gaussian splat visibility: toggle splats render
- Toggle occlusions: between different loaded NVOL files. This, however will, in turn, reduce the visualisation quality
- Camera speed: Control the camera speed movement
6. Known Limitations and Bugs
- Center position indicator in the top right menu is not updated correctly for the Rotation tool when using the pivot.
- Sometimes the pivot in the Rotation tool will appear at the origin when changing tools. Moving the pivot slightly will move it to the correct coordinate.
- The pivot translation speed in the Rotation tool is not controlled by the Shift key.
- The camera moves slightly backwards when the pivot in the Rotation tool is being moved.
- Sometimes clicks wont register on buttons if the focus on the window is lost. You will need to click twice.
- Clustering progress bar is only updated in chunks
- Clustering can not be stopped mid process
- Surface Selection tool can not be changed in size
- A project that uses Volinga plugin cannot be packaged as a shipping .exe.
- Only one NVOL can be rendered at a time. If a level has more than one Volinga Radiance Fields Actor in place, only one of them will render.
- Drag & drop a NVOL directly from explorer to Unreal viewport causes undefined behavior. Try to drag & drop it from explorer to content browser and after that drag it from content browser to the viewport instead.